The vast majority of engineered products have multiple components that need to fit together. Sometimes you need components to slip together easily, while other times, you need components to press together and not come apart. There’s a systematic way to design parts so they fit together exactly the way you want on the first try, every time, and in this video, we show you how!
The engineering term for this consideration is “fits and tolerances”. Let’s define these terms. Most of the time, especially in CAD, we just type single, exact numbers into the computer for our dimensions. That’s called a “nominal” dimension. But when it comes time to actually make that part, we won’t be able to manufacture the features to exactly those dimensions. Each feature might be slightly larger or smaller than the number we originally typed into the computer. So, we need to specify a “tolerance” which tells the person manufacturing the part how much of a variation from our nominal dimension is acceptable.
Different manufacturing processes are capable of different tolerances. It’s important to remember that tolerance capability corresponds to a large production run, where factors like tool and machine wear, deflection, sharpening, and the natural variation of different processes apply. A very common mistake that new engineers make is selecting tolerances that are far tighter than necessary. As the tolerances become tighter, the cost to manufacture the part grows exponentially.
So how tight of a tolerance do you need? Tolerances typically come into play when designing fits. In some cases, you might want components to slip easily together, but not have a lot of perceptible play. In other cases, lots of relative movement is okay. You might even need to have two components come together permanently and not come apart. These different cases are called “fits”.
Machinery’s Handbook is the go-to reference for designing fits. Fits have a particular naming convention of a two-letter abbreviation followed by a number.
The letters denote the type of fit, and the number corresponds to the tolerance class of the fit, with larger numbers representing looser tolerances. This video deals primarily with ASME fits in the inch system, but there is a similar convention for metric. The naming convention is different, but the general concept is the same. For more information, you can reference Machinery’s handbook, or ISO 286-2.
Be sure to watch the video to see examples of six different types of common fits, and some general guidelines for how to manufacture them.
Why doesn’t the LC 11 shaft have a designation? I see the hole is H13.
Referencing 2:19 in the video showing Machinery’s Handbook with ASME fits and there is no hole designation for LC 11 shaft; The hole/shaft symbols “H10, g9” etc. in this table are referencing the ABC (American-British-Canadian) Hole and Shaft agreement.
In the forward of ANSI/ASME B4.1-1967 they talk about the ABC conferences and the recommendation from conferences in the 1940s-1960s to implement a common reference between the three countries. This was before ISO 286, but I am not very familiar with the history of the metric standards and how the ABC recommendations fit into it.
This ABC recommendations cover some common ground but isn’t everything. The agreement comprises:
– A grade system of fundamental tolerances for diameters 0.04 inch to approximately 20 inches, the tolerance values in each grade being to the diameter by a given law of formula and each grade of tolerance being approximately related to the others in the system in a preferred number ratio (R5 series, with 60 percent increments).
– A series of unilateral hole limits derived from the fundamental tolerances, for use with a hole basis system.
– A series of shaft, one of these limits being determined by the allowance (according to some technical requirement), the other being derived from it by addition or subtraction of the fundamental tolerance.
– A selection of fits made by recommended association of certain of the holes and shaft, the selection being adequate to cover most engineering requirements.
So I think that is why there is no shaft size for the ABC LC11 equivalent
Because the ASME B4.1 standard has not been updated since 1967, this info is still shown in Machinery’s Handbook. But to me it seems like unnecessary information. It isn’t equating ISO 286, it is equating these old ABC conference recommendations that preceded ISO 286. They look like the same letter/number designations of ISO 286 but I wouldn’t use this to drive equivalent fits between ANSI/ASME and ISO (because I am not 100% confident of the relation between ABC and ISO).
If I were trying to figure out ASME B4.1 and ISO 286-2 equivalents I would go to the native fit units and convert it and find the equivalent that way. However that is not something that I have ever had to do. If I had to convert an ISO fit to US customary dimensions, I would not try to equate the tolerance classes, I would just provide dimensions.
Most of what I draft is woodworking related, but I am always interested mechanical drafting and engineering so I watch machining videos on youtube and ran across this one. I was confused myself as to why there were H7, e8, etc, limits in the ANSI chart.
Yours is the only mention I’ve been able to find about ABC conferences/system as to the explanation of their use in the tables and I can’t find any information searching google for the ABC system.
I agree that they don’t seem to equate to ISO H7/h6 type fits and are their own thing. Unfortunately I don’t have a Machinery’s Handbook or ANSI standards to reference or dig into further. I just wanted to thank you for verifying I wasn’t missing something obvious.
I have another question about the ANSI standard. It seems that hole is the driving feature, meaning that one of the limits is usually the nominal dimension. I generally machine my holes and buy shaft, with one of the limits of the shaft being the nominal dimension. (3/4″ rotary shaft on McMaster Carr has a diameter tolerance of -0.0004″ to 0″) Because of this i really just look at the clearance and adjust my hole tolerances accordingly. Should i be doing this a different way or is there a shaft driven tolerance that i could use? How would you guys deal with this?
Thanks
Great question! The fits are hole-based as you observed. This is because back in the day of the standard’s publishing (1967) interpolating hole sizes easily on a CNC machine wasn’t done–holes were accurately made mostly with standardized reamers. Unusual hole sizes required boring which was expensive and slow. Nonetheless, the authors of the standard accounted for a shaft-based system, where the fits have an “S” after them (like RC2S, LC1S) designating them as shaft size-driven fits. They are the same sizes as the regular fits but the S is showing that its shaft-driven.
ASME/ANSI B4.1 section 9.3 Basic Shaft Fits (Symbol S) says “The limits for hole and shaft sizes as given in Tables 5 to 9 [which are the tables in Machinery’s Handbook] are increased for clearance fits, or decreased for transition or interference fits, by the value of the upper shaft limit; that is, by the amount required to change the maximum shaft to the basic size”
That pretty much describes what you are doing!
Do we mark only the tolerance values on the engineering drawing of an assembly or do we need to give the name of the fit in the drawing as well? If we need to give the name of the fit, what is the proper way of doing that?
It is not customary in drawings that conform to ASME standards to name the fit; just provide the dimensions.


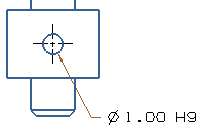
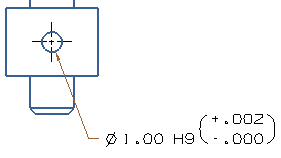
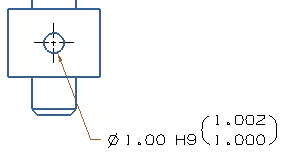
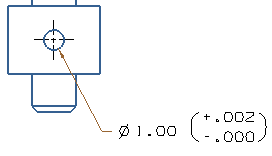
However, for ISO standard conforming drawings, you have options. (1) You may put the nominal hole or shaft size with the fit name (e.g. DIA 1.00 H9). (2) You may put the limit dimensions of the fit with that (DIA 1.00 H9 [1.002/1.000]). (3) You may put the deviation with the name of the fit (DIA 1.00 H9 [+.002/-.000]). (4) You may omit the fit name and only put the dimensions (DIA 1.00 [+.002/-.000]). Below are images showing these examples.